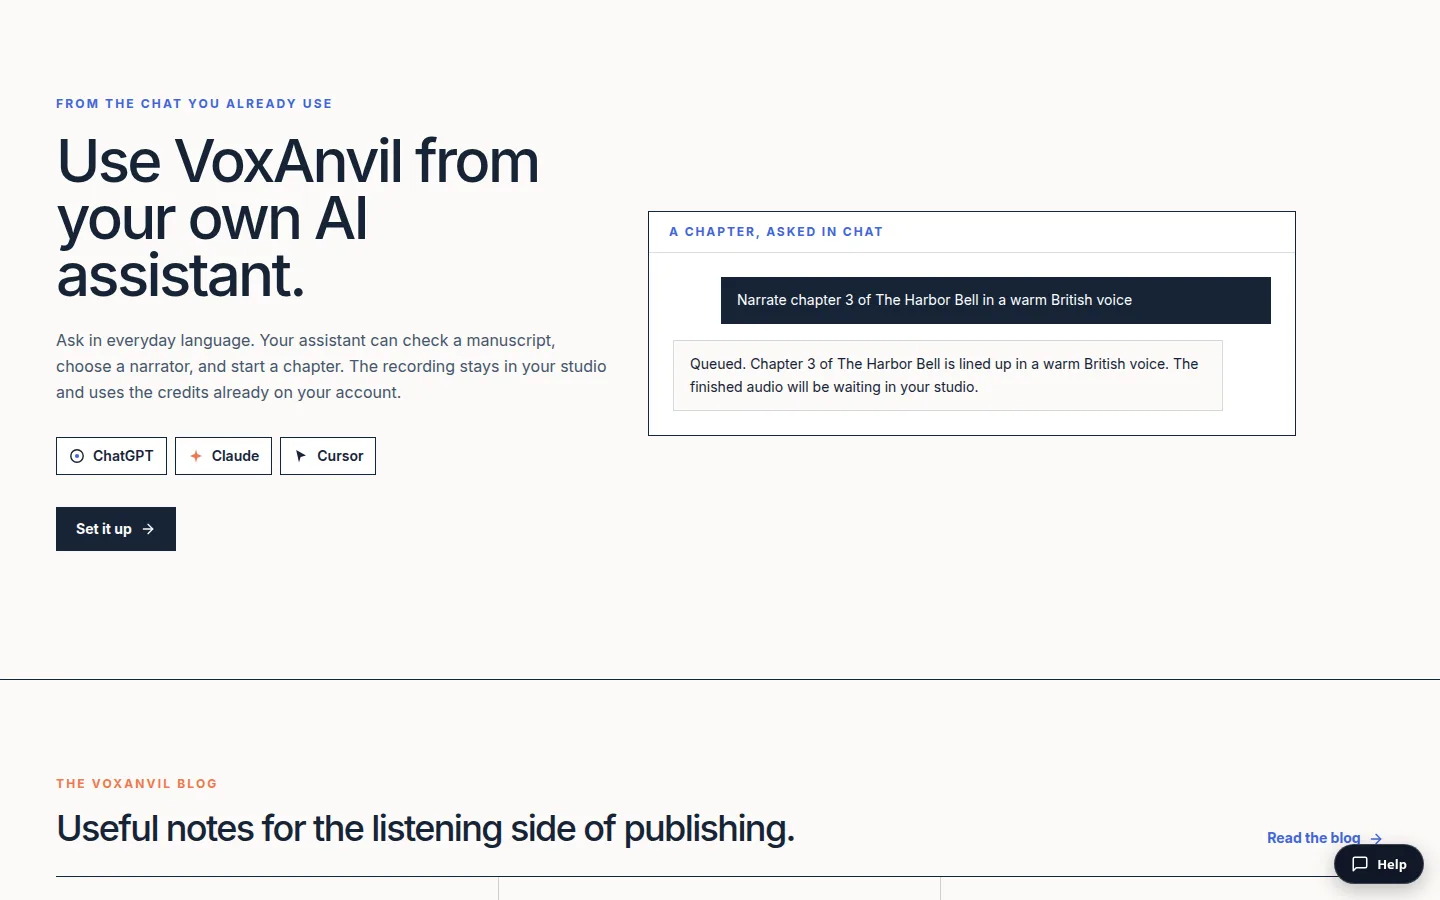
You may already have a chat window open while you revise. You paste a scene in, ask whether a line of dialogue sounds stiff, and paste it back. Until now, turning that chapter into audio meant switching tools, uploading the file again, and clicking through a studio. VoxAnvil now works from inside ChatGPT, Claude, and Cursor, so you can ask your assistant to check a chapter, pick a narrator, and start the recording from the same conversation.
This guide walks through the setup for each assistant, a first session from manuscript to finished chapter, and the controls that keep your account safe. Nothing here changes how narration is priced: the assistant spends the same chapter credits you would spend in the studio, and nothing more.
What your assistant can do
Once connected, your assistant can use eight tools on your account, and only the ones you allow:
- List voices. The ten curated narrators, plus any ready voice clone on your account.
- Create a project. Give it a title and paste manuscript text, or point it at a public file link. Chapters split the same way a studio import does.
- Run the manuscript check. The same preflight scan the studio uses. It flags numbers, abbreviations, contractions, names, punctuation, currency, and dates that a voice might misread. It does not spend chapter credits.
- Start narration. Queue one chapter, a few chapters, or the whole book with one voice. It hands back a job number right away.
- Check a job. See whether each chapter is queued, running, finished, or needs another try.
- List projects. See the projects on your account, and only yours.
- Get download links. Signed links to finished chapter audio.
- Check your credit balance. See your credits and plan before you start a long book.
The assistant never sees your password, and it never touches another author's projects. Every request is checked against your account on the server, not in the chat.
Before you start
You need a VoxAnvil account with at least one chapter credit, and a manuscript that is ready to hear. If the book is still moving, finish the line edit first. Narration is the most expensive place to discover a typo.
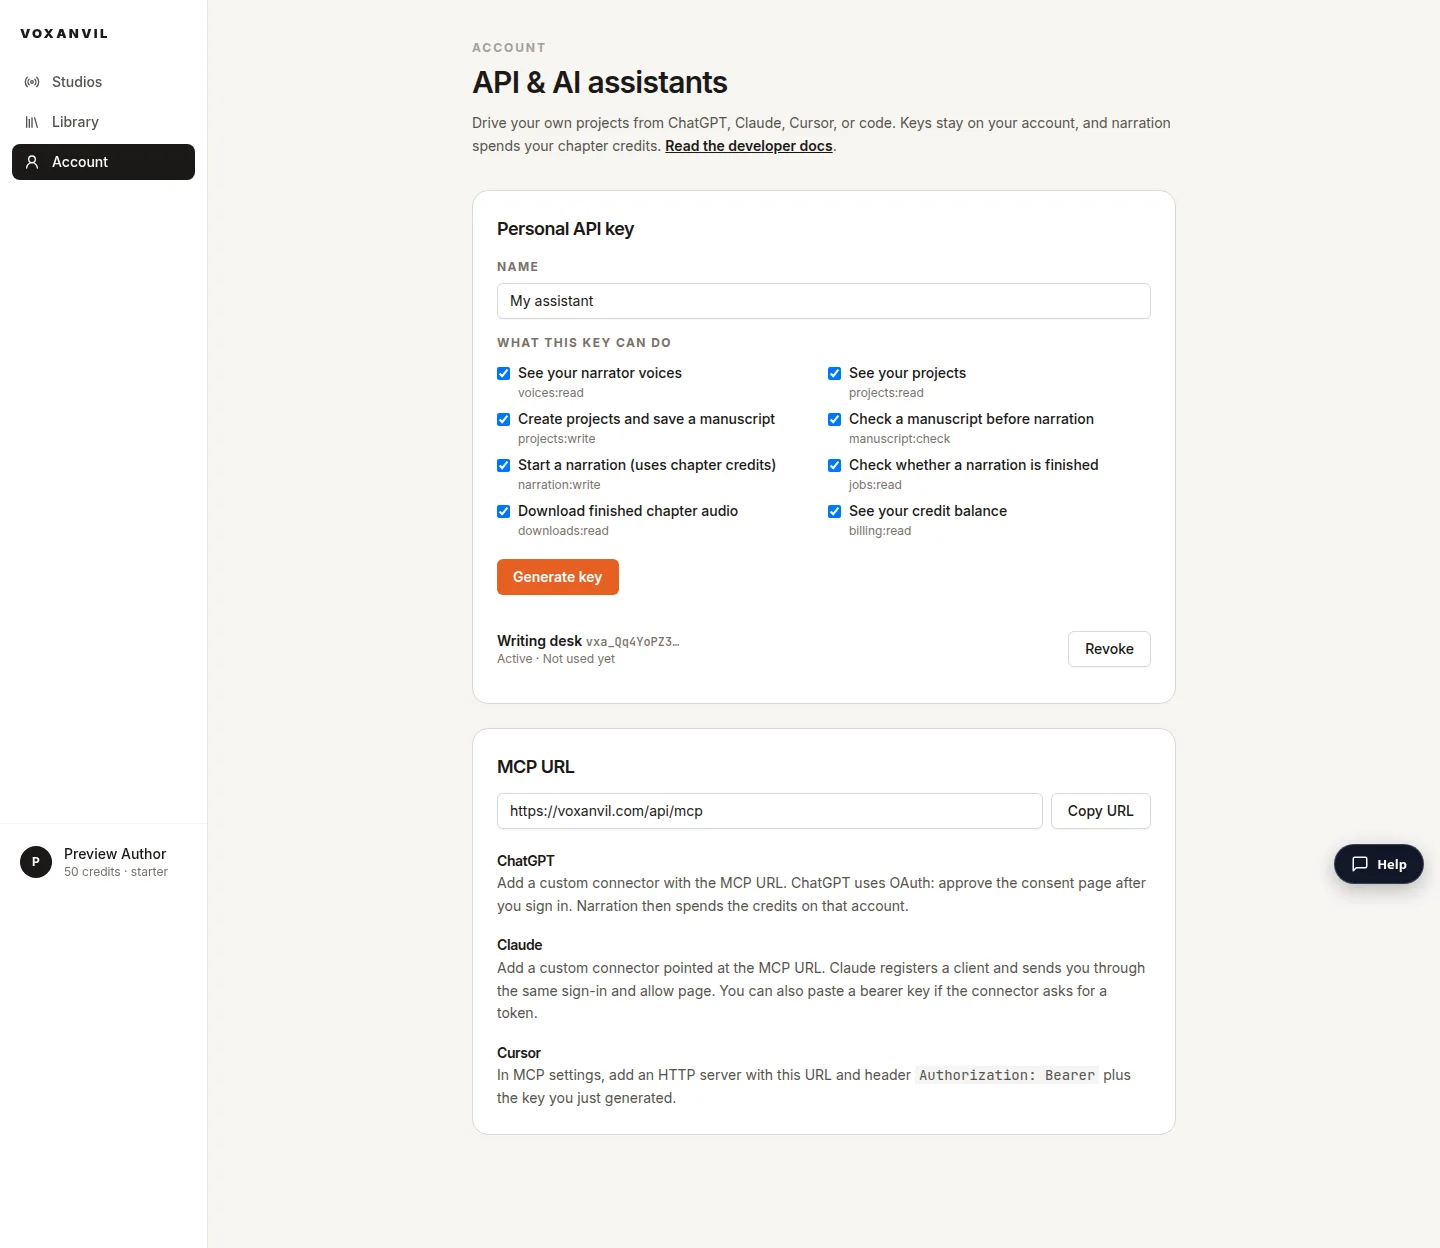
Open Account → API & AI assistants. That page has everything the setup needs: the MCP URL, a place to make a personal key, and a list of assistants you have already connected.
Connect ChatGPT
ChatGPT connects through a sign-in and allow page, so you never paste a key.
- In ChatGPT, open the settings for connectors and add a custom connector.
- Paste the MCP URL from your account page:
https://voxanvil.com/api/mcp. - ChatGPT sends you to VoxAnvil. Sign in if you are not already.
- Read the allow page. It names the assistant, lists exactly what it is asking to do, and shows where you will be sent back to. Click Allow only if you started this connection.
From then on, ChatGPT can use the tools you allowed. Access lasts an hour at a time and renews quietly in the background until you disconnect it.
Connect Claude
Claude uses the same flow.
- Add a custom connector in Claude's settings and paste the MCP URL.
- Claude registers itself with VoxAnvil and opens the same sign-in and allow page.
- Approve the scopes you want it to have.
If your Claude setup asks for a bearer token instead, make a personal key (next section) and paste that.
Connect Cursor or your own code
Cursor and scripts use a personal key.
- On the account page, name the key after where it will live, for example "Writing desk" or "Cursor".
- Untick anything it should not do. A key that only checks manuscripts does not need Start a narration.
- Click Generate key and copy it right away. VoxAnvil keeps only a scrambled fingerprint of the key, so it cannot show it again.
- In Cursor's MCP settings, add an HTTP server with the MCP URL and the header
Authorization: Bearerfollowed by your key.
The endpoint list lives with the key form after you sign in, if you would rather call the studio from a script.
Your first session
Here is a realistic first run with a short chapter. Type in your own words. The assistant chooses the tool.
1. Create the project. "Make a VoxAnvil project called The Harbor Bell and add this chapter," then paste the text. The assistant reports the project, the word count, and how many chapters it found.
2. Check before you spend. "Run the manuscript check on The Harbor Bell." You get back the flags: a year that could be read two ways, a character name with no stated pronunciation, "Dr." in the middle of a sentence. Fix them in your manuscript, or tell the assistant how each should be said and paste the corrected chapter in again. This step is free.
3. Pick a voice. "Which narrators would suit a quiet coastal mystery with a British setting?" The assistant lists the voices with their accents and styles and suggests a few. Ask for a sample in the studio if you want to hear one first.
4. Start the chapter. "Narrate chapter 1 with that voice." The assistant tells you how many credits it will spend, gives you a job number, and returns right away. A chapter is one credit for up to 2,500 words, and a longer chapter costs the same multiple shown on the pricing page.
5. Collect the audio. A few minutes later: "Is chapter 1 finished?" When it is, ask for the download link. Download it when you ask. The chapter also waits in your studio, where you can listen, fix a word, and regenerate.
Spend credits on purpose
The assistant cannot spend more than your balance. If a request would take you below zero, it stops and says so. If a chapter fails partway, its credits come back automatically.
Retries are safe too. Assistants sometimes resend a request when the connection blips. When they include a retry key, VoxAnvil returns the original job instead of starting a second one, so you are never charged twice for the same chapter. If you write your own scripts, send an Idempotency-Key header with each narration request.
There are limits that protect your account if something goes wrong: sixty calls a minute per key and ten narration starts an hour. They are well above what a person in a chat will use.
Stay in control
- Narrow the scopes. Give each key or assistant only what it needs.
- Revoke at any time. A revoked key stops working on its next call, not at the end of the day.
- Disconnect assistants. The Connected assistants list on the account page shows every assistant you have allowed. Disconnect cuts it off at once.
- Keep keys private. Treat a personal key like a password. If one ends up in a shared document or a screenshot, revoke it and make a new one.
When to use the studio instead
The chat is fast for checking, queuing, and collecting. The studio is still the better place for close listening: comparing two takes, adding a pronunciation rule for a name that repeats, and reviewing a chapter line by line before it goes to a retailer. Most authors will use both. Start the book from the conversation where you wrote it, then do the final listening pass in the studio.
Connect an assistant from the account screen after you sign in. The key is shown once.